How to Create User Story in Azure DevOps? | A Step-by-Step Guide
User stories are represented as work items in Azure DevOps, allowing you to manage and track them effectively throughout the development lifecycle. Creating a User story in Azure DevOps is a straightforward Process. This guide will walk you through the process of creating user stories in Azure DevOps, covering each step in detail.
Navigate to the Backlog in Azure DevOps
The first step in creating user stories is to navigate to your backlog in Azure DevOps. Your backlog contains all of your stories, features, and epics that need to be completed.
To access the backlog, first log in to your Azure DevOps account. Then navigate to Boards > Backlogs from the left sidebar. This will open up your team’s backlog. Having a centralized backlog makes it easy for your entire team to access, organize, and update stories.
Create a New User Story
Once you have opened your backlog, it’s time to create a new user story. You can do this by clicking the “+ New Work Item” button at the top and selecting “User Story” from the dropdown menu.
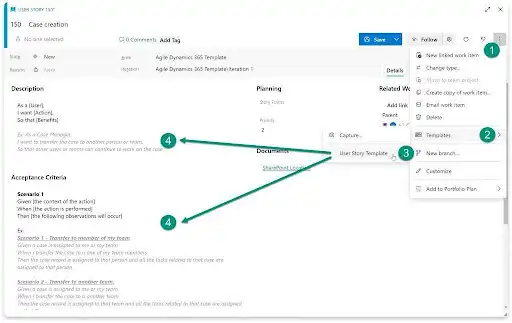
This will open a user story template where you can enter all the key details.
Enter a Title and Description
The title and description fields are where you define the core components of what the user story will deliver.
For the title, come up with a short name that summarizes what the story is all about. For example, “As a user, I can reset my password.”
In the description field, you’ll want to expand on the title providing more context on what needs to be built. Follow the common “As a [type of user], I want [some feature] so that [some reason]” format.
Really focus on specifics from an end-user perspective when detailing the description.
Define Acceptance Criteria
A key part of creating effective user stories entails defining done. What are the standards that must be met for the story to be considered successfully complete and working as expected?
Document clear acceptance criteria that outline functionality, non-functional elements like performance and security, design, or any other considerations.
Get very granular with acceptance criteria to avoid ambiguity. List out validation steps to confirm criteria as well. Well-defined acceptance criteria prevent scope creep down the line.
Assign an Owner
With the basics of the user story fleshed out, the next step is to assign it to an owner. The owner will serve as the driver ultimately accountable for bringing it to completion. You can assign user stories to individual contributors or entire teams who will work collaboratively to implement the defined functionality.
Score the User Story
Scoring each user story based on difficulty level aids in estimation and planning. Common scoring systems include t-shirt sizing (XS, S, M, L, XL) or a numeric scale like Fibonacci (1, 2, 3, 5, 8, etc.).
These scores quantify the predicted effort so your team can factor it into sprint planning and task breakdowns. Update scores over time as greater clarity is achieved.
Set the Priority
The priority indicates how essential that user story is relative to others. Setting priority helps the team sequence the backlog, ensuring they tackle the most important stories first.
Prioritization considers value to customers, foundational dependencies, and effort versus impact. Mark certain must-haves in this release as “high priority” while parking nice-to-haves with lower priority.
Mark User Story Status
As work gets underway, update the status field to reflect the current state. Common agile status values include:
- Active – being worked on in the current iteration
- Resolved – code complete pending validation
- Completed – meets all acceptance criteria
Updating status communicates progress at a glance.
Break Into Tasks
For larger user stories, break them down into a set of smaller tasks required for implementation. This helps distribute subsets of work across team members. You can create related tasks directly under your user story in Azure DevOps. This keeps all the work interconnected in one place.
Log Time Spent
As devs work on tasks associated with user stories, have them log their time. This provides key data points around the level of effort and where time is being spent. Over sprints, aggregated time metrics help improve the estimation and planning of future stories.
Link Other Items to the Story
Link user stories to related artifacts like designs, tests, or support tickets. These connections improve traceability and visibility into scope.
Other associations to explore:
- Related defects or impediments
- Associated feature requests
- Related Documentation
- Upstream/downstream dependencies
Add Labels to Your Story
The strategic use of labeling through tags makes filtering and reporting on user stories a breeze.
Some suggested labels to consider:
- Epic
- Release
- Component/module
- Type (feature, tech task, spike, bug)
Standard labels across stories enable easier global management of backlogs.
Move to the Done Column
A core agile concept is having workflow through set stages in a pipeline. Represent this within Azure DevOps by dragging user stories across a visual board view through phases from left to right.
For example:
To Do -> In Progress -> Testing -> Completed
This kanban-style approach provides greater visibility into throughput.
Once all acceptance criteria are met, drag the associated tasks and story over to the “done” stage for closure.
Review at Sprint End
Following each sprint, hold a retrospective meeting with stakeholders and team members to review recently completed stories. Discuss what worked well along with areas for improvement. Capture any notes or next steps directly on relevant user stories for reference.
This regular cadence of inspection and adaptation uncovers opportunities to streamline processes around building and managing user stories.
FAQs – Frequently Asked Questions and Answers
- How long should a user story be?
Answer: No strict length but aim for user stories that can be reasonably completed in 1-2 weeks. Break anything larger into standalone child stories.
- Can I include technical requirements in a user story?
Answer: Focus mainly on user value in the story itself. Technical details can be covered in tasks, acceptance criteria, or linked documents.
- Where do defect fixes belong – separate tickets or under a story?
Answer: Add defects as tasks linked to relevant user stories to maintain connections between issue and resolution.
To Conclude
User stories are an essential part of agile project management, and Azure DevOps provides a powerful platform for creating and managing user stories. By following the steps outlined in this article, you can effectively capture user requirements, track progress, and deliver valuable features to your users.
Remember, user stories are a living document, so don’t be afraid to revisit and update them as your project evolves.