How to Check the Oracle Database Version? 3 Methods to Do It
Oracle Database is a widely-used relational database management system. Understanding the database version is crucial for users and administrators, as it helps understand functionality, assess upgrades, and ensure compatibility. This article explores 3 most used methods to determine the version of Oracle Database.
Using SQL*Plus or SQLcl
Firstly, we have to open our terminal or command prompt. By entering the “sqlplus” or “sql” command, followed by the username and connection identifier, we may launch SQL*Plus or SQLcl. We can use the following syntax if we are connecting as a privileged user, such as SYSDBA or SYSOPER:
  “sqlplus sys as sysdba”
  Or,
  “sql sys as sysdba”
A prompt to input the “SYSDBA” (or “SYSOPER”) password will appear. If we are connecting with a regular user, we can use:
  “sqlplus username/password@connection_identifier”
  Or,
  “sql username/password@connection_identifier”
We have to change “username” to the proper database username, “password” to the user’s password, and “connection_identifier” to the connection identifier or the Oracle Net service name.
Once we are connected, execute the following SQL query:
“SELECT * FROM v$version;”From the view ‘v$version,’ this query fetches version data. When we hit Enter, a list of entries with different version information will appear in the query result. We’ll discover the Oracle Database version information in one of these rows.
Please be aware that the ‘v$version‘ view might need the proper access rights. The query can be successfully executed by users with relevant rights, such as the SYSDBA, SYSOPER, or DBA role. Check that you are connected with the correct user and that the necessary rights are allowed if you have any problems.
Using Oracle Enterprise Manager (OEM)
Access the Oracle Enterprise Manager URL in our web browser. The URL will vary depending on how our business has configured Oracle Enterprise Manager. Typically, it looks like this:
“https://oem_hostname>:port>/em”
Log into Oracle Enterprise Manager using appropriate credentials and grant necessary permissions to access database information. Access version details on the home page to verify the database version.
We have to go to the “Database Home Page” of the particular database whose version we are interested in learning. We may accomplish this by selecting “Targets” from the top menu, followed by “Databases” from the side menu. Click on the name of the target database after finding it in the list.
We may discover numerous database performance and setup details on the “Database Home Page.” On this page, the version information is usually shown. A section or label specifying the database version should be found.
Additionally, you could discover a section titled “Database Information” or “General Information” on the “Database Home Page,” where the version specifics are plainly shown.
The exact location of version information on Oracle Enterprise Manager may vary depending on the OEM version and setup. If trouble locating version information, consult the “About” or “Help” sections of the OEM interface.
Using Oracle SQL developer
Launch Oracle SQL Developer on your computer. We may get SQL Developer from the Oracle Technology Network (OTN) website if we don’t already have it installed. The “Connections” pane will appear after SQL Developer is launched. If this window doesn’t show, we may bring it up by choosing “Connections” from the top menu’s “View” option.
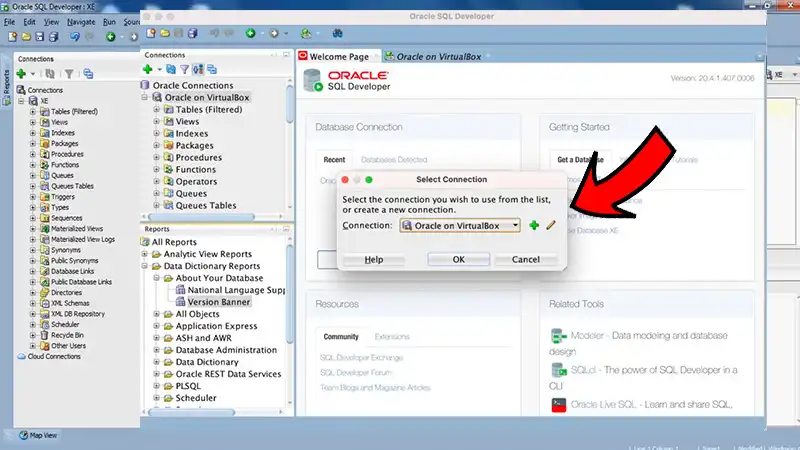
Choose an existing database connection from the “Connections” box or create a new one. Click “Connections” with the right mouse button, then select “New Connection.”
In the “New/Select Database Connection” window, enter the following details:
- Connection Name: A name to identify the connection (e.g., MyDB).
- Username: The username to connect to the database (e.g., SYS, HR, SCOTT, etc.).
- Password: The password for the specified username.
- Connection Type: Choose “Basic.”
- Role: Choose “Default.”
- Hostname: The hostname or IP address of the server where the database is located.
- Port: The port number of the Oracle listener (default is usually 1521).
- SID: The System Identifier of the Oracle Database (e.g., ORCL).
Alternatively, we can use the “Service Name” instead of the “SID” if your Oracle Database uses the newer service name format.
To check the connection information, click “Test.” We will get a “Status: Success” notice if the connection is successful. Utilizing the given credentials, click “Connect” to establish a connection to the Oracle Database. Once connected, the SQL Developer window will have a new tab at the top that is named with our connection name.
Type the following SQL query in the SQL Worksheet:
“SELECT * FROM v$version;”This query retrieves version information from the view “v$version.” Run the query using F5 or the “Run Script” button to find Oracle Database version information in rows with varying version information.
How to check the SQL database version in cmd?
Choose Start > Run on the workstation where SQL is installed, type cmd into the Open field, and then hit Enter to open a command prompt window. At the cmd prompt, enter SQLCMD -S servername\instancename (where servername = the name of your server, and instancename is the name of the SQL instance). The cmd prompt will change to 1>
Type select @@version and press Enter. At the 2> cmd prompt, enter go, and then press Enter. The SQL version that is running on our workstation is displayed. If we have multiple instances, we can repeat the process for each instance.
To Conclude
Checking the Oracle database version is crucial for efficient and wise updates. Various methods, such as command-line interfaces, graphical tools, or database banners, provide quick and efficient access to version information.
This knowledge ensures application compatibility and maximizes Oracle’s capabilities. Maintaining an updated Oracle Database is essential for optimal performance, security, and effectiveness.